Showing posts with label bread. Show all posts

Saturday, July 27, 2013

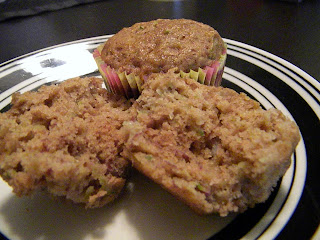
Zucchini Banana Muffins

Still no baby. So I'm still baking! The other day I thought I would try out zucchini bread and it turned out pretty yummy! I decided to make these as muffins to make them last longer (or at least theoretically last longer) but you could make this as one loaf also. They aren't super sweet and I liked that the recipe didn't call for refined sugar and only uses one kind of GF flour. Slap some schmear on these babies in the morning for a delicious breakfast, or serve warm with butter and a cup of tea (for me these days it's raspberry leaf tea all day long). The next time you have zucchini on hand whip up a batch of these and enjoy any time of day!


What you need (adapted from inspired-housewife.com) 
(Makes 1 loaf or 18 muffins)


- 2 C sorghum flour
- 1 tsp baking soda
- 1 tsp cinnamon
- 1/8 tsp salt
- 2 bananas, mashed
- 2 eggs
- 1/4 C melted butter
- 1/2 C honey
- 1 tsp vanilla
- 2 C grated zucchini


Directions

- Preheat oven to 350 degrees

- Line your muffin pan or grease your loaf pan and set aside

- In a small bowl, combine the dry ingredients and stir well (flour, baking soda, cinnamon and salt)


- In a medium bowl, combine the wet ingredients except for the zucchini (bananas, eggs, butter, honey and vanilla) and stir well (I used an electric mixer to break up the banana)


- In 1/4 C increments, add the dry mix to the wet ingredients, mixing after each addition. Be careful not to over-mix or your bread will turn out tough


- Gently fold in the grated zucchini and stir


- Pour batter into loaf pan or evenly separate into muffin tin.

- Bake at 350 degrees for 1 hour (loaf) or 18-20 minutes (muffins)


- Serve and enjoy!


Monday, June 3, 2013

Lemon Poppyseed Muffins

My craving for homemade baked deliciousness continues! I'm not usually a huge carbs eater (especially being GF) but the past couple of weeks all I've wanted are muffins and coffee cakes. So, I've been trying out my favorite GF flour blend and baking some things on my own. The latest recipe is for Lemon Poppyseed Muffins. They came out really well and I was very happy with them (so was the husband). Hopefully this craving will cease soon so I don't end up gaining 40 lbs by the end of this pregnancy! Here's the recipe for ya!


What you need (makes 30 mini muffins)
- 1/2 C butter, softened
- 1 C sugar
- 2 eggs
- 1 2/3 C GF flour (my recipe HERE)
- 3/4 C buttermilk
- Zest of 1-2 lemons (I used about 1 1/2)
- 1/4 tsp salt
- 1/2 tsp baking soda
- 1 T poppy seeds


Directions

- Preheat oven to 350

- Combine sugar and butter and beat with a mixer until light and fluffy


- Add the eggs, mixing well after each one

- Add the flour, milk, lemon zest, salt and baking soda and mix until just incorporated


 - Add the poppyseeds and gently stir until mixed


- Divide the batter into a greased muffin tin. I made these as mini muffins but you could do regular size or even a loaf if you wanted


- Bake at 350 for 18-20 minutes or until lightly brown around edges and on top


- You can stop there if you like but I wanted a little more lemon flavor in mine. So I mixed the juice from 1 lemon and 1 T of sugar and brushed the top of each muffin with it. It really added a nice pop of tart lemon flavor which I loved. You can skip this step though if you prefer or have another use for your lemons.


Ta - dah! The husband really liked these and so did our church worship team! There are only 3 left so I think I'll go finish those as my breakfast this morning! Happy baking everybody!

Friday, May 24, 2013

Blueberry Yogurt Muffins

My latest pregnancy craving has been homemade baked things...yummy bread, coffee cake, muffins...you name it, I want it. I found a couple recipes on Pinterest that I wanted to try and make gluten free, one of them being these delicious looking blueberry yogurt muffins.

These were great! I scarfed down 2 of them as soon as they came out of the oven. About 5 minutes after I finished, Joshua got the hiccups and started moving like crazy...which I'm taking as a sign that he liked them too! What I liked most about these is that they weren't too sweet so the blueberry flavor really came through. I liked that they are made with yogurt instead of butter too!

You could easily make these as mini muffins but I stuck with the original recipe. I'm already planning on making another batch and look forward to eating these for breakfast over the next week. Oh who am I kidding...these will be gone in a couple days. But shhh don't tell.

Here's the recipe!

What you need (makes 12 regular size muffins) - adapted from CookingAndMe.com


- 1 C plain yogurt
- 1 egg
- 1/2 tsp vanilla
- 1/4 C oil (I used coconut)
- 2 C all purpose flour (my blend is listed below)
- 1/2 C sugar
- 1 tsp baking powder
- 1/2 tsp baking soda
- 1/4 tsp salt
- 1 1/4 C blueberries (I used frozen)


Favorite Flour Blend - from the Gluten Free Bible

- 1 C white rice flour
- 1 C sorghum flour
- 1 C cornstarch
- 1 C coconut flour (or almond flour)
- 1 C tapioca flour

Sift together and store in an airtight container. You can easily double/triple the recipe as well!


Directions

- Preheat oven to 375 and line muffin tin with baking cups

- In a medium bowl, combine the yogurt, egg, vanilla and oil and mix together


*If you're using coconut oil, add it gradually so it won't harden when it hits the cold yogurt*

- In another medium bowl, combine the flour, sugar, baking powder, baking soda and salt


- Remove 1 T of the dry ingredients and toss with the frozen blueberries. This will help keep them from sinking straight to the bottom of your muffins


- Gently fold in the wet ingredients to the dry. Don't overmix or the muffins will be tough

- Add the blueberries and gently stir. The batter should resemble cookie dough and don't worry if it turns purple from the blueberries


- Fill your muffin cups evenly and bake for 20 minutes, or until a toothpick comes out clean


- Let cool for 5 minutes and enjoy!


Tuesday, March 19, 2013

Freezer Cooking Day Part 2

Welcome to Freezer Cooking Day 2! As I mentioned in the previous post, I really enjoyed splitting up the cooking over 2 days. It helped me not feel rushed or stressed out and I knew what my stopping points were for each day. You don't have to do it this way by any means, it's just what helped me the most this time around.

Since I had the most time on Saturday, I decided to use Sunday as the "no cook" recipe day. We went to church, I came home and took a nap, made these recipes, and STILL had time that night to relax and hang out with my husband. Here's a list of the recipes (with links) that I made on day 2:

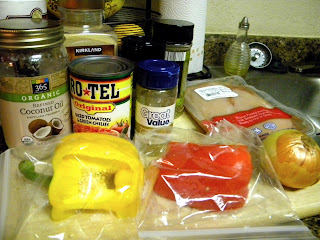
- Oven Baked Chicken Fajitas (Follow freezer directions in post)
- Crockpot Italian Chicken (Follow freezer directions in post)
- Honey Garlic Chicken (I made this twice because its so easy and a favorite!)
- Cinnamon Rolls (I made 2 batches. Follow freezer directions in post)


Here was my game plan:

Step 1: Assemble and prepare all ingredients for Fajitas and place in gallon freezer bag.


Step 2: Place ingredients for Italian Chicken in gallon freezer bag

A 3 ingredient meal! Love it!

Step 3: Assemble and prepare ingredients for Honey Garlic Chicken and place in gallon freezer bags

I made this recipe twice because we love it so much!

Step 5: Clean counters and prepare cinnamon rolls. This was the longest recipe because it required some mixing. But the others were literally 10 minutes at the MOST to prepare.


Step 6: Clean up and RELAX! All done!


This gave us about 17 meals (including lunch leftovers for myself and Jon) plus the granola to snack on and cinnamon rolls for 2 mornings. I'd say it was definitely worth all the hard work! I mapped out when to serve each meal but obviously things change and happen (like um...finding out you're pregnant!) and meal plans get thwarted. All that to say I will definitely be doing this again before the baby comes so that we have have meals ready to go! 

I hope this inspires you all to take some time (even if it's just a few hours) and get some meals prepared! I promise it will be worth it!

Wednesday, January 23, 2013

Cinnamon Rolls

The holiday season is the perfect time for cinnamon rolls! Actually I think any season is perfect for cinnamon rolls but that's just me. I've been wanting to make these for a while so finally I hunkered down, cast aside my fear and made two batches of these babies. I made these during my Freezer Cooking Day (which I will be sharing soon!) so I didn't bake them. I simply shaped them, put them in aluminum pans, wrapped them well and stuck them in the freezer until we needed them. They were DELICIOUS!! I still haven't mastered the perfect frosting for them yet, but the actual roll itself was so good. Even the husband was impressed! I hope you enjoy them too!

What you need (recipe from The Gluten Free Homemaker - makes 8 rolls)

Dough
- 2 T butter
- 1/4 C sugar
- 2/3 C warm milk (I used almond)
- 1 egg
- 1/4 C oil (I used coconut)
- 1 tsp vanilla
- 1 T instant yeast
- 1/2 C sorghum flour
- 1 C corn starch
- 1/4 tsp baking soda
- 2 1/2 tsp xanthan gum
- 2 tsp baking powder
- 1/2 tsp salt


Filling
- 2/3 C brown sugar
- 1 1/4 tsp cinnamon
- 1/3 C chopped nuts (optional) *I did one batch without and one batch with*


Directions

- Using a mixer, combine the butter and sugar and mix well

- Add the milk, egg, oil and vanilla. Beat well

- In a separate bowl, combine the dry ingredients and add to the wet mixture

- Beat on high until well mixed. The dough will be soft but should not have any lumps


*OK, this part can be a little tricky but it works! And makes clean up super easy!*

- Tape a piece of plastic wrap to your counter and sprinkle it lightly with sugar

- Place the dough on top and cover it with another piece of plastic wrap, sprayed with cooking spray

- Using a rolling pin, roll out the dough until it is a 13 1/2 inch square (or closely resembles one) 


- Take off the top piece of plastic wrap 

- Mix together your filling ingredients


- Sprinkle the filling over the dough, leaving a margin on one side (so you don't lose any filling when it's rolled up)


- Lift the bottom piece of plastic wrap off the counter and encourage the dough to roll. It should roll by itself after you get it started.


- Once completely rolled, cut the dough into 8 equal pieces


- Place in pan and either cover and freeze or bake immediately at 375 degrees for 20 minutes


- Make a simple glaze using powdered sugar, milk and vanilla while they bake


- Enjoy!

Wednesday, November 14, 2012

Pumpkin Bread

I love pumpkin bread. To me there is nothing that says "here comes fall" like a nice warm piece of pumpkin bread and a cup of hot tea on a chilly day. This was the perfect fix for a whopper of a pumpkin craving I had the other day. The best part about this recipe (other than the fact that it tastes uh-mazing) is that it makes 3 loaves at once. Perfect for gifts or to freeze for later! I personally plan on making this again ASAP. The husband after saying "This is GLUTEN FREE??" described it as "A cool autumn day in my belly." He's so silly...but seriously it is. The original recipe called for oil but I substituted unsweetened applesauce and it worked awesome! Can't wait for you to try it!

What you need (for 3, 8 x 4 inch loaves)

- 2 1/2 C white rice flour
- 1/2 C cornstarch
- 5 tsp pumpkin pie spice
- 2 tsp baking soda
- 1 1/2 tsp salt
- 1 tsp xanthan gum
- 4 eggs
- 1 C applesauce
- 1/2 C orange juice (no pulp)
- 3 C granulated sugar
- 1 Can pumkin puree (not pie filling!)


Directions

- Preheat the oven to 350 degrees and spray your loaf pans. Set aside

- Combine all the ingredients up through the xanthan gum in a stand mixer (I've been borrowing my mom's for a few weeks now...sorry mom I'll bring it back one day I promise!)


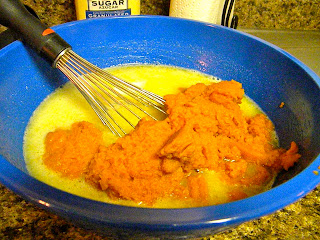
- In a separate mixing bowl, combine the eggs, applesauce and orange juice. Add in the sugar and canned pumpkin and whisk together well


- Add the wet ingredients to the dry and whisk together until smooth. You may need to scrape down the sides a couple of times.


- Separate the batter into the 3 loaf pans evenly.


- Bake for 1 hour or until a toothpick comes out clean


- Serve warm! I had 2 pieces the day I made these. The first one I had plain and it was great. The second piece I added cream cheese and a cup of tea. Add in the rainy drizzle outside and it was a perfect afternoon treat! YUM!


- Such a delicious fall treat! Next time I'll add some pumpkin seeds on top of the batter before baking!

I have some exciting posts coming up in the next few weeks. A freezer cooking day, gluten free cinnamon rolls and the VanLue family Thanksgiving just to name a few! Keep checking back!

Thursday, October 18, 2012

Pasta, Bread and Snacks...oh my!

It's been a while since I've done a post about products I like. So as you might suspect, this is a post about products I like! For those of you who may be new to gluten-free living, I know how easy it is to feel overwhelmed and what a struggle it can be to find replacements for things. A lot of people don't realize how hard it is to find gluten-free items that don't taste like cardboard or that aren't filled with tons of sugar and fat. These products are ones that I've been using for a while so I trust them. I'm know there are other kinds out there, maybe even better than the ones I use, but once I found something that I liked (and even more importantly that the husband liked) I stopped looking. This is a list of simple staples that I always try to keep on hand so that I'm never caught in a pinch come lunch or dinner time. I hope it helps you and gives you some products to try!

Pasta
We eat pasta at least once a week. With my work schedule I need easy and simple meals 3 nights a week that take 20 minutes or less. Pasta is always a great choice for us. We both love it and it's easy to make meatless pasta dishes if you're trying to reduce your meat intake (which we are!). We usually have Spaghetti once a week (usually Monday nights) and Broccoli Alfredo another night.

For spaghetti I use Ancient Harvest Quinoa spaghetti style noodles:


These noodles are really great for spaghetti. They hold up well, but you just want to be careful with the cooking time. If you cook them too long they can start to get mushy and fall apart a bit. A great thing about these noodles is that they are made from quinoa so they are full of protein, which is especially good if you are making meatless spaghetti. I like these better than the long rice noodles.

For the alfredo pasta and most other pasta dishes I usually go with Tinkyada Brown Rice Penne:


This pasta has awesome texture. In addition to the broccoli alfredo I've also used it in most of my other pasta dishes. The husband really likes this kind as well. Again, as with most rice pastas you want to make sure you follow the recommended cooking time since the texture will change if they are under or over cooked. 


Bread
I actually don't eat bread very often. Occasionally I'll have a piece of toast with dinner, but I rarely make sandwiches for myself anymore. I usually keep a loaf of Udi's whole grain GF bread in the freezer and I can make it last a while. The pieces are smaller than regular bread...ok they are much smaller but if you're trying to cut carbs then that's actually a good thing!


I also really like Udi's plain bagels. I keep them frozen and then thaw them out for 30 seconds in the microwave, and then toast them and top with cream cheese or jelly. They can be a little dry if you toast too much, but when you are really craving a bagel and "schmear" that is easy to overlook!


Snacks
I think snacks can be some of the hardest things to adjust to when going gluten-free. At least it was hard for me! I'm definitely a salty over sweet kinda girl so not being able to have pretzels, cheezits and wheat thins anymore was devastating! Although I've tried to get away from most conventional snack foods like crackers and chips, I still get cravings for something crunchy and salty. Here are some great gluten-free snacks that I have come to love. 


I love these multi-seed crackers. I have featured them before on the blog. They sell them in bulk at Costco but also smaller bags at Publix and Whole Foods. I like them plain, with hummus, or with some cheddar cheese. YUM.

These rice chips are fantastic. They have multiple flavors and they are rice, not corn. I've only seen small bags at Publix but they do go on sale every once in a while. The husband likes these too!


I really like these veggie straws. They are made from potato, spinach, and tomato and are lightly salted. I like them just as much as chips (but the husband doesn't). These are also sold in bulk at Costco in individual bags which are great for lunch boxes and picnics!


These are my second favorite crackers. They are on the expensive side because of the ingredients, but they are delicious! They come in a variety of flavors, are pretty much available at all grocery stores and definitely satisfy my salty craving. I like eating these plain but are good with hummus or any other kind of dip also.


Some other natural snacks that I enjoy are:
- Celery and peanut butter
- Rice cakes with nutella and bananas
- Carrot sticks and hummus (try my red pepper hummus)
- Trail mix
- Granola  (find my recipe here)
- Any fresh fruit (We get Orlando Organics fruit delivery every other week. They are awesome!)


I know this post is long, but I wanted to be thorough in my suggestions! Do you have any favorite gluten free products that you use? I would love to hear them!

I promise I'll have some recipes coming up soon! Chicken Noodle Soup, Melt in your mouth Chicken, and Dirty Rice with Sausage are just a few in the lineup...not to mention some yummy apple recipes just in time for fall!