Showing posts with label snacks. Show all posts

Thursday, October 18, 2012

Pasta, Bread and Snacks...oh my!

It's been a while since I've done a post about products I like. So as you might suspect, this is a post about products I like! For those of you who may be new to gluten-free living, I know how easy it is to feel overwhelmed and what a struggle it can be to find replacements for things. A lot of people don't realize how hard it is to find gluten-free items that don't taste like cardboard or that aren't filled with tons of sugar and fat. These products are ones that I've been using for a while so I trust them. I'm know there are other kinds out there, maybe even better than the ones I use, but once I found something that I liked (and even more importantly that the husband liked) I stopped looking. This is a list of simple staples that I always try to keep on hand so that I'm never caught in a pinch come lunch or dinner time. I hope it helps you and gives you some products to try!

Pasta
We eat pasta at least once a week. With my work schedule I need easy and simple meals 3 nights a week that take 20 minutes or less. Pasta is always a great choice for us. We both love it and it's easy to make meatless pasta dishes if you're trying to reduce your meat intake (which we are!). We usually have Spaghetti once a week (usually Monday nights) and Broccoli Alfredo another night.

For spaghetti I use Ancient Harvest Quinoa spaghetti style noodles:


These noodles are really great for spaghetti. They hold up well, but you just want to be careful with the cooking time. If you cook them too long they can start to get mushy and fall apart a bit. A great thing about these noodles is that they are made from quinoa so they are full of protein, which is especially good if you are making meatless spaghetti. I like these better than the long rice noodles.

For the alfredo pasta and most other pasta dishes I usually go with Tinkyada Brown Rice Penne:


This pasta has awesome texture. In addition to the broccoli alfredo I've also used it in most of my other pasta dishes. The husband really likes this kind as well. Again, as with most rice pastas you want to make sure you follow the recommended cooking time since the texture will change if they are under or over cooked. 


Bread
I actually don't eat bread very often. Occasionally I'll have a piece of toast with dinner, but I rarely make sandwiches for myself anymore. I usually keep a loaf of Udi's whole grain GF bread in the freezer and I can make it last a while. The pieces are smaller than regular bread...ok they are much smaller but if you're trying to cut carbs then that's actually a good thing!


I also really like Udi's plain bagels. I keep them frozen and then thaw them out for 30 seconds in the microwave, and then toast them and top with cream cheese or jelly. They can be a little dry if you toast too much, but when you are really craving a bagel and "schmear" that is easy to overlook!


Snacks
I think snacks can be some of the hardest things to adjust to when going gluten-free. At least it was hard for me! I'm definitely a salty over sweet kinda girl so not being able to have pretzels, cheezits and wheat thins anymore was devastating! Although I've tried to get away from most conventional snack foods like crackers and chips, I still get cravings for something crunchy and salty. Here are some great gluten-free snacks that I have come to love. 


I love these multi-seed crackers. I have featured them before on the blog. They sell them in bulk at Costco but also smaller bags at Publix and Whole Foods. I like them plain, with hummus, or with some cheddar cheese. YUM.

These rice chips are fantastic. They have multiple flavors and they are rice, not corn. I've only seen small bags at Publix but they do go on sale every once in a while. The husband likes these too!


I really like these veggie straws. They are made from potato, spinach, and tomato and are lightly salted. I like them just as much as chips (but the husband doesn't). These are also sold in bulk at Costco in individual bags which are great for lunch boxes and picnics!


These are my second favorite crackers. They are on the expensive side because of the ingredients, but they are delicious! They come in a variety of flavors, are pretty much available at all grocery stores and definitely satisfy my salty craving. I like eating these plain but are good with hummus or any other kind of dip also.


Some other natural snacks that I enjoy are:
- Celery and peanut butter
- Rice cakes with nutella and bananas
- Carrot sticks and hummus (try my red pepper hummus)
- Trail mix
- Granola  (find my recipe here)
- Any fresh fruit (We get Orlando Organics fruit delivery every other week. They are awesome!)


I know this post is long, but I wanted to be thorough in my suggestions! Do you have any favorite gluten free products that you use? I would love to hear them!

I promise I'll have some recipes coming up soon! Chicken Noodle Soup, Melt in your mouth Chicken, and Dirty Rice with Sausage are just a few in the lineup...not to mention some yummy apple recipes just in time for fall!


Friday, August 24, 2012

Roasted Red Pepper Hummus

I love hummus! It is such an awesome snack and/or meal and can be eaten with practically anything. The other day at the store, garbanzo beans were on sale so I bought a bunch. I put them in salads a lot but had never tried to make my own hummus. I also had a couple of red peppers to use up so it seemed like a no brainer to experiment with them! What better way than to make my own hummus? This came out really delicious despite not having all the ingredients for a "proper" hummus and it is WAY cheaper than store bought. Do any of you have a favorite hummus recipe?

What you need
- 1 1/2 C garbanzo beans, drained and rinsed
- 1/2 C roasted red peppers *see below*
- 3 cloves garlic, peeled
- 1/2 tsp cumin
- 1/8 tsp cayenne pepper
- 3 T extra virgin olive oil
- 1 T sesame oil (not pictured, sorry!)
- 2 T water
- Salt and pepper to taste


Roasted Red Pepper Instructions
Yes, they sell jars of already roasted red peppers but it's super easy to make your own!

- Rub each pepper with coconut or vegetable oil. Don't use olive oil because it will burn.

- Place peppers on a baking sheet and put under the broiler until they start to blister and blacken


- Carefully flip the peppers over and return to broiler until the other side blisters and starts to blacken


- Let the peppers cool completely before touching them! They will be very hot!

- Gently remove the stem, seeds and ribs and peel off the skin. It should remove very easily. Cut in half and make sure all the seeds and ribs are removed.


- And there you have it! Roasted red peppers!


Hummus Directions

- In a food processor, add the beans, peppers, garlic, cumin, cayenne, water, salt and pepper


- Put the top on and pulse the processor a few times just to get the ingredients combined. Stream in the olive oil and sesame oil until it reaches desired consistency. Taste to check seasonings and adjust if necessary.

- I served mine with GF crackers and topped the hummus with some paprika, parsley and feta cheese. This was my lunch today along with some fruit. Yum!


Thursday, May 17, 2012

Product Review

It's been a while since I've done a product review. I don't always buy gluten free products in the store when I see them mainly because they are usually expensive and quite a few of them taste like cardboard. Plus, most of the gluten free packaged products have tons of added sugar and fat to make up for the lack of that tasty gluten stuff and I want to try to avoid all that. On the other hand, convenience items are kind of hard to come by so I have tried a couple in the past few weeks. Here's one that I really enjoyed. I found them at Costco (thanks Mom!) and they are a great snack option. The husband liked them too and said they tasted like Fruity Pebbles. I've never had Fruity Pebbles so I couldn't make the comparison. All I can tell you is that they're good. Really good. And healthy!

Introducing Mrs. May's Almond Rice Stix!


These little almond rice sticks are packed with cranberries, blueberries, golden raisins, almonds and toasted rice. The are 100% natural, gluten free and have no trans fat, saturated fat or cholesterol. Winner!! I've seen these sold on Amazon as well and you could probably find them in other grocery stores or Whole Foods. They were reasonably priced at Costco for such a large bag and they are a great grab and go option. Give 'em a try!

Monday, April 23, 2012

To die for muffins

A while back I experimented a bit with banana bread muffins. I took my original recipe for banana bread and tweaked it a bit, then added a brown sugar crumb topping. Oh my goodness. These are without a doubt my favorite muffins and now I set some bananas aside to get over-ripe just so I can make these. The husband loves them and says he could eat them all day. I also got rave reviews from gluten eaters that said these didn't taste gluten free at all (yay!!) Hope you all enjoy them!

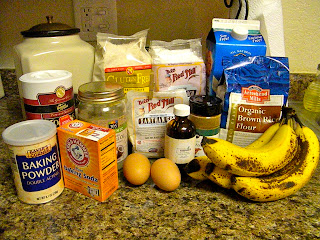
What you need (makes about 40 mini muffins)
- 1/2 C brown rice flour
- 1/4 C potato starch
- 1/4 C sorghum flour
- 1 tsp baking soda
- 1/2 tsp baking powder
- 1/2 tsp salt
- 1 tsp cinnamon
- 1 tsp xanthan gum
- 1/2 C coconut oil
- 3/4 C sugar
- 2 eggs
- 1 tsp vanilla
- 2 mashed bananas
- 1/4 C almond milk


Directions


- Preheat oven to 350 degrees

- Combine the first 8 ingredients in a medium bowl (through the xanthan gum)


- In a separate larger bowl, beat the oil, sugar, eggs and vanilla until smooth

*Note: If you're using coconut oil, make sure it's in liquid form before you add it. Also, make sure the eggs are room temperature. I added the oil a little bit at a time to keep it from solidifying. If it gets too cold it won't mix in and will turn back to a solid.


- In a small bowl, mash the bananas with the almond milk


- Alternate adding the dry ingredients and the mashed bananas/milk to the sugar and egg mixture. Start and end with the dry. (I did dry, banana, dry, banana, dry)

- To make the topping: Combine 2/3 C brown sugar, 4 T brown rice flour, and 1/4 tsp cinnamon.


- Cut in 2 T of cold butter until the mixture resembles the picture below


- Pour the batter into a greased muffin tin and top with the brown sugar topping if using


- Bake at 350 degrees for 18 minutes, or until a toothpick comes out clean


- I like making the mini size but you could make regular size too if you prefer. These are best eaten while still warm, but are good the next day as well. Just make sure you store them in an airtight container so you don't lose the moisture. Enjoy and happy Monday friends!


Thursday, April 19, 2012

Baked Mozzarella Sticks

Who doesn't love breaded and gooey mozzarella sticks? I've made homemade ones before with panko breadcrumbs and lightly frying them in oil. They were amazing. This time around, I substituted gluten free breadcrumbs and added some seasoning and parmesan cheese. Instead of frying them I baked them and they turned out well. They definitely weren't as good as the memory I have of the gluten-full ones, but they were good enough and pretty easy to make. The husband liked them too!

What you need (makes 24 sticks)
- 12 sticks mozzarella string cheese
- 2 T white rice flour
- 1 large egg, beaten
- 8 T gluten free breadcrumbs (I got Glutino)
- 3 T italian seasoning
- 2 T grated parmesan cheese
- cooking spray


Directions
- Cut the cheese sticks in half and place on a baking sheet. Freeze for about an hour.


- When the cheese sticks are frozen, assemble the dredging station


- Put the rice flour on a small plate, the egg in a bowl, and combine the breadcrumbs, italian seasoning and parmesan cheese in another bowl.

- Roll each stick in the rice flour


- Then the egg


- And finally the breadcrumb mixture


- Place on a foil lined baking sheet and put back in the freezer until ready to bake. The freezing is really important so that the cheese doesn't melt before the coating becomes crispy.


- When ready to bake preheat the oven to 400 degrees

- Spray the sticks with cooking spray

- Bake for 4-5 minutes, then flip, spray again with cooking spray and bake for another 4 minutes

- Serve with warm marinara sauce for dipping. Enjoy!


Thursday, March 22, 2012

Spinach Dip

Hey everyone!
Sorry I haven't posted in a while. My husband's brother and his wife came down from Charlotte for a visit this past weekend (such a blast!!) so I was a bit preoccupied! Today I have a really easy, simple and tasty appetizer recipe for you. I made this last night for our community group and I'm pretty sure everybody liked it! (The husband didn't taste this one because he's not a spinach fan) It's really versatile and you could easily add or omit things. I've found that it's pretty difficult to mess up spinach dip. Next time I think I will add artichoke hearts and some red pepper flakes for some heat. Bell peppers and sun dried tomatoes would be delightful as well!

I'll have Jon's favorite Jambalaya recipe up soon also so be sure to check back for that! Happy Thursday to you and yours!

What you need
- 2 boxes of frozen chopped spinach, thawed
- 1 medium onion, chopped
- 1 tsp garlic, minced
- 3 green onions, chopped
- 5 oz cream cheese
- 1 C sour cream
- 1 1/2 C grated mozzarella cheese
- 1/2 C parmesan cheese (not pictured)
- 1/4 tsp cayenne pepper
- splash of half & half (or milk)
- salt and pepper


Directions


- Preheat oven to 375

- In a small skillet, heat a bit of oil over medium heat

- Add chopped white onion and garlic and cook 3 minutes (or until translucent and fragrant)


- In a medium bowl, combine the spinach, onion and garlic, green onion, cream cheese, sour cream and half & half


- Mix together until combined


- Add in the cayenne pepper and a dash of salt and pepper (probably 1/4 tsp of each)

- Stir in 1 C of the mozzarella cheese and all of the parmesan


- Put the mixture in a buttered baking dish


- Top with the remaining mozzarella cheese. Bake for 20-25 minutes, until bubbly


- While baking, conquer the mile high pile of dishes in your sink. Oh...maybe that's just me.


- Serve immediately with chips or crackers


*NOTE: For a lower fat version substitute low fat cream cheese and sour cream and use skim milk instead of the half and half.

Wednesday, March 14, 2012

Banana Pecan Oatmeal Bread

Hi friends! So I've had almost rotting bananas on my kitchen counter for a week now just sitting there staring at me and occasionally screaming "make me into something yummy!" I finally caved today and made banana bread. I have to admit, gluten free baking still scares me. I'm sure I'll eventually get to the place where it doesn't phase me to substitute flours without a recipe, but for right now I purposefully avoid baking if I can help it. This blog is helping me overcome that...and so did the rotting bananas! I am extremely pleased with how my first attempt of this recipe came out. I'll probably end up tweaking it a little next time but it really is delicious and I can't even tell the difference. Honestly. On the other hand since my tastebuds haven't had the pleasure of bread or a pastry in 3 months I could just be so darn happy to eat a bread-like substance that doesn't resemble cardboard that I don't notice a difference. Make it for yourself and you decide.

Banana Pecan Oatmeal Bread (adapted from the GlutenFreeHomemaker.com)


What you need
- 1/2 C brown rice flour
- 1/4 C sorghum flour
- 1/4 C potato starch
- 1 C rolled oats (g. free)
- 1 tsp baking soda
- 1/2 tsp baking powder
- 1/2 tsp kosher salt
- 1 tsp ground cinnamon
- 1 tsp xanthan gum
- 1 /2 C coconut oil (or oil of choice)
- 3/4 C sugar
- 2 eggs
- 1 tsp vanilla
- 1 1/2 C mashed bananas (about 3)
- 1/4 C almond milk 
- 1/2 C chopped pecans


Directions

- Preheat your oven to 350

- In a small bowl combine the first 9 ingredients (through the xanthan gum)


- In a large bowl mix together the oil, sugar, eggs and vanilla until smooth


- Mash your bananas in a small bowl. Add the milk and mix gently


- Alternate adding the dry ingredients and the banana mixture to the oil mixture, beginning and ending with the dry ingredients, and stir until smooth. (dry, bananas, dry, bananas, dry is what I did)


- Here is what the batter should look like


- Chop up some pecans


- And stir them in gently


- Pour batter into a greased loaf pan and bake for 50-60 minutes, or until a toothpick comes out clean


- Ta-Da!


- Allow the bread to cool before slicing

- Enjoy!