Showing posts with label healthy. Show all posts

Wednesday, February 15, 2017

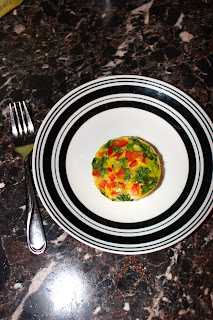
Spinach & Red Pepper Frittatas

I'm currently on my second week of the Whole30. I wanted to do a reset after the holidays, but was traveling in January and then ended up getting the stomach flu (and the hubs and kids too...ugh). So, I started February 6th. So far it's going well! I'm not having my kids or husband do it with me, except for dinners, because I'm not making 2 separate dinners! In an effort to not spend hours in the kitchen everyday prepping food for myself, I decided I would have the same breakfast every day during the week, do something different on the weekends, and then just have either leftovers or mason jar salads for lunches. This way, except for dinner, I wouldn't really have to turn on the stove or oven during the day! It worked out well the first week, and hopefully I can keep it up.

I thought I would share part of my weekday breakfast, since it has become my favorite meal of the day. Having these things prepped and ready to go for the whole week has been a HUGE help. These are completely Whole30 compliant (no grains, no legumes, no dairy, no added sugar) but if you aren't on the whole30 you can switch out ingredients for whatever you like!

Spinach & Red Pepper Frittatas
(Makes 12)

What you need:


  • 10 large eggs, beaten
  • 2 Cups baby spinach, chopped
  • 1/2 Cup red bell pepper, diced
  • 1/4 Cup green onion, sliced
  • 1/2 tsp sea salt
  • 1/4 tsp pepper
  • Cooking spray


Directions:

- Preheat oven to 350

- Spray a 12 cup muffin tin with cooking spray and set aside

- Add the salt and pepper to the beaten eggs and set aside

- Divide spinach evenly among the muffin cups


- Add the red pepper and green onions


- Carefully add the beaten eggs, leaving a little room at the top


- Bake for 20-25 minutes, or until the eggs have set


- Allow to cool completely, and store in an airtight container in the fridge


- Microwave for 1-2 minutes when ready to eat


This is my favorite vegetable combination, but you can of course change it up to your tastes! Broccoli, mushrooms, tomatoes, kale and meats like bacon & ham would be great too! And of course, cheese if you aren't dairy free! Enjoy!


Monday, February 3, 2014

Easy Breakfast Egg Cups

The husband and I are embarking on a new eating plan this week! We are still going to be gluten free but are taking the extra step and cutting out simple and complex carbs and sticking to a high protein / low sugar plan. I have about 10 pounds of baby weight that I want to kick and the husband just wants to get back in a good workout/ healthy eating routine.

So, in order to streamline my cooking efforts a bit I decided to try making a high protein breakfast for the hubs to eat every morning, but didn't require me to wake up with him each morning to cook it. I mean I love him and all, but his 6 a.m. alarm comes way too soon for this tired mama who has usually been up 2-3 times with the 6 month growth spurting offspring. (seriously...give me ALL the coffee today).

The result of my desire to feed the husband well but still get another hour of shut eye resulted in these little babies. They are delicious, quick and can be kept in the freezer during the week. The husband just pops them in the microwave for a couple minutes and voila...homemade gourmet breakfast! Ok...maybe not gourmet...but better than cereal or pop-tarts. Here's the handy dandy recipe!


Breakfast Egg Cups

What you need (makes 14)

- 12 large eggs
- 1 Cup milk
- 6 strips bacon, cooked and chopped
- 1/4 C diced red pepper
- 1/4 C diced onion
- 1 C shredded cheddar cheese
- 1/2 tsp salt
- 1/4 tsp pepper


Directions

- Preheat oven to 350 degrees and grease a 12 cup muffin tin. This recipe makes 14 "muffins" because I wanted them to last a whole week so you'll have a little extra after the first batch. If you only want to make 12 just reduce the eggs to 10 and 3/4 C of milk.

This is my new best friend. I love it!

- Beat the eggs slightly and add the milk. Continue beating until smooth and slightly frothy


- Add in the bacon, peppers and onion


- Add in 1 cup of shredded cheese and the salt and pepper


- Evenly distribute the egg mixture into the muffin cups


- If you're feeling fancy, top with a little dried parsley flakes.

- Bake at 350 for about 15-20 minutes, until the eggs have set and are puffed up


- Run a knife around the edges to release and invert them onto a cooling rack (this will prevent them from collapsing too much)


- I wrap 2 "muffins" in a piece of foil and place them in a freezer bag. The husband eats 2 every morning which is equivalent to 2 eggs and along with the bacon in there it's a pretty filling and hearty breakfast.

- You can easily add whatever combination of vegetables and cheese/spices you like. Ham, broccoli, asparagus, spinach, parmesan, feta - hard to mess these up!

Wednesday, November 13, 2013

Cheesy Broccoli Orzo

I made this the other night as our side dish for dinner and boy was it delicious! It was so easy and the husband gobbled it up and declared it something he wanted again. Well ok then!

I had never had orzo before but I saw a GF version at WalMart and figured it was worth a shot! It looks exactly like rice in shape and size but it's actually a pasta!

*If you can't find GF orzo you could substitute your favorite rice, and just cook the rice and broccoli separately, and add on some cooking time for the rice.*

 The orzo cooks super quick and this dish took 10 minutes start to finish and I only used 1 pot. I mean does it get any better than that? Here's how to make it!


What you need (from Iowagirleats.com)

- 1 C GF orzo
- 1.5 C broccoli florets (I actually bought "cut broccoli" by accident but it was good too)
- 1/4 C shredded cheddar cheese
- 2 T shredded parmesan cheese
- 1 T butter
- 1/4-1/2 C milk


Directions

- Bring a large pot of salted water to a boil. Add orzo and cook for 3 minutes.

- Add broccoli and cook for 3 more minutes or until orzo is tender


- Drain well and return to pot, but off the heat

- Add the cheese, butter and 1/4 C of milk. Stir well and add more milk if you need to


- Season with salt and pepper to taste (I always use seasoned salt and only needed about 1/4 tsp)

- I served ours with some simple baked chicken and it was a quick and easy under 30 minute weeknight meal!


Saturday, November 9, 2013

Philly Cheesesteak Stuffed Peppers

Can you believe I'm actually posting a recipe?!? I haven't been trying any new recipes lately mainly because I don't have time to sit and look up new ones to try in the midst of keeping my 3 month old alive and moving to our new house in Charlotte. But...I made this the other night and it was good enough to share! Next time I think I will add some red pepper flakes for some spice and maybe try to "doctor up" the meat a little more, but for a first time new recipe it was great! And the husband really enjoyed it as well which is always a good thing!

Please forgive me for not taking as many pictures as I normally do with recipes. My reasons for the lacking photos...see above.


What you need (no picture - because well...see above)

- 4 green bell peppers, cut in half with seeds and ribs removed
- 1.5 lb deli sliced roast beef
- 16 slices provolone cheese
- 1 large onion, sliced
- 5 cloves garlic, minced
- 4 T butter
- 4 T coconut oil
- Salt and pepper to taste


Directions

- Preheat oven to 400 degrees

- In a large skillet or dutch oven, heat the butter and oil over medium-low heat

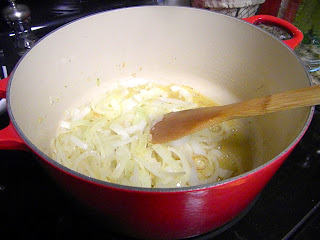
- Add the onions and garlic and sautee until caramelized, about 30 minutes. You'll want to stir them often to keep from sticking


- Once the onions have caramelized, add in the roast beef and cook an additional 5 minutes to let the flavors combine. Add salt and pepper to taste


- Line each pepper half with a piece of provolone cheese

- Fill each pepper half with the beef/onion mixture and top with another piece of cheese


- Arrange peppers in a casserole dish and bake 15-20 minutes, or until the cheese becomes golden and bubbly


- Serve and enjoy!

I served ours with white rice and we enjoyed cutting up the peppers and mixing it all together!


More new recipes coming soon!

Saturday, July 27, 2013

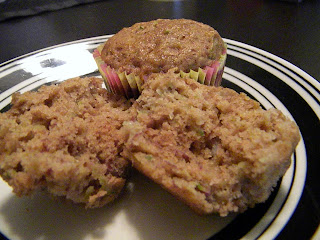
Zucchini Banana Muffins

Still no baby. So I'm still baking! The other day I thought I would try out zucchini bread and it turned out pretty yummy! I decided to make these as muffins to make them last longer (or at least theoretically last longer) but you could make this as one loaf also. They aren't super sweet and I liked that the recipe didn't call for refined sugar and only uses one kind of GF flour. Slap some schmear on these babies in the morning for a delicious breakfast, or serve warm with butter and a cup of tea (for me these days it's raspberry leaf tea all day long). The next time you have zucchini on hand whip up a batch of these and enjoy any time of day!


What you need (adapted from inspired-housewife.com) 
(Makes 1 loaf or 18 muffins)


- 2 C sorghum flour
- 1 tsp baking soda
- 1 tsp cinnamon
- 1/8 tsp salt
- 2 bananas, mashed
- 2 eggs
- 1/4 C melted butter
- 1/2 C honey
- 1 tsp vanilla
- 2 C grated zucchini


Directions

- Preheat oven to 350 degrees

- Line your muffin pan or grease your loaf pan and set aside

- In a small bowl, combine the dry ingredients and stir well (flour, baking soda, cinnamon and salt)


- In a medium bowl, combine the wet ingredients except for the zucchini (bananas, eggs, butter, honey and vanilla) and stir well (I used an electric mixer to break up the banana)


- In 1/4 C increments, add the dry mix to the wet ingredients, mixing after each addition. Be careful not to over-mix or your bread will turn out tough


- Gently fold in the grated zucchini and stir


- Pour batter into loaf pan or evenly separate into muffin tin.

- Bake at 350 degrees for 1 hour (loaf) or 18-20 minutes (muffins)


- Serve and enjoy!


Wednesday, July 17, 2013

Black Bean Soup

You all know I am a huge lover of soup. There really is no designated "soup weather" for me, I can eat it and love it anytime of year. The other day I had a serious craving for black bean soup and since it was a "healthy" craving I decided to oblige.

I'm going to have a serious wake up call when I'm no longer pregnant and still have these "cravings."

Anyway, the husband is not the biggest fan of black beans. He usually prefers pinto beans if given the choice but because he's the best husband ever and knows not to argue with a pregnant lady by now, he happily ate this (and said he enjoyed it and would want it again!)

I served this over yellow rice (another craving) so it became a bit thick. You don't have to serve it this way if you want it "soupier." Hope you all enjoy it!


What you need
- 2 cans black beans, undrained
- 2 C chicken broth
- 1/2 green pepper, diced
- 1/2 large onion, diced
- 2-4 cloves garlic, minced
- 1 T cornstarch
- 1 tsp cumin
- 1 tsp dried oregano
- yellow rice (optional)


Directions

- In a large pot, heat 1 T oil (I used my trusty coconut oil) over medium heat

- Add the onion, pepper and garlic and saute for 2-3 minutes


- While the vegetables are cooking, add one can of black beans and the chicken broth to a blender

- Puree for a few seconds. You don't want it completely smooth


- Add the pureed beans and the other can of beans to your vegetables

- Add in the spices and cornstarch and bring to a boil for 2 minutes


- Taste and add more seasoning if necessary. If you want it to be a bit spicy you can add some crushed red pepper flakes.

- Serve over yellow or white rice and top with sour cream. Yum!


This is a great and filling meatless meal and the leftovers are great too!

Friday, May 24, 2013

Blueberry Yogurt Muffins

My latest pregnancy craving has been homemade baked things...yummy bread, coffee cake, muffins...you name it, I want it. I found a couple recipes on Pinterest that I wanted to try and make gluten free, one of them being these delicious looking blueberry yogurt muffins.

These were great! I scarfed down 2 of them as soon as they came out of the oven. About 5 minutes after I finished, Joshua got the hiccups and started moving like crazy...which I'm taking as a sign that he liked them too! What I liked most about these is that they weren't too sweet so the blueberry flavor really came through. I liked that they are made with yogurt instead of butter too!

You could easily make these as mini muffins but I stuck with the original recipe. I'm already planning on making another batch and look forward to eating these for breakfast over the next week. Oh who am I kidding...these will be gone in a couple days. But shhh don't tell.

Here's the recipe!

What you need (makes 12 regular size muffins) - adapted from CookingAndMe.com


- 1 C plain yogurt
- 1 egg
- 1/2 tsp vanilla
- 1/4 C oil (I used coconut)
- 2 C all purpose flour (my blend is listed below)
- 1/2 C sugar
- 1 tsp baking powder
- 1/2 tsp baking soda
- 1/4 tsp salt
- 1 1/4 C blueberries (I used frozen)


Favorite Flour Blend - from the Gluten Free Bible

- 1 C white rice flour
- 1 C sorghum flour
- 1 C cornstarch
- 1 C coconut flour (or almond flour)
- 1 C tapioca flour

Sift together and store in an airtight container. You can easily double/triple the recipe as well!


Directions

- Preheat oven to 375 and line muffin tin with baking cups

- In a medium bowl, combine the yogurt, egg, vanilla and oil and mix together


*If you're using coconut oil, add it gradually so it won't harden when it hits the cold yogurt*

- In another medium bowl, combine the flour, sugar, baking powder, baking soda and salt


- Remove 1 T of the dry ingredients and toss with the frozen blueberries. This will help keep them from sinking straight to the bottom of your muffins


- Gently fold in the wet ingredients to the dry. Don't overmix or the muffins will be tough

- Add the blueberries and gently stir. The batter should resemble cookie dough and don't worry if it turns purple from the blueberries


- Fill your muffin cups evenly and bake for 20 minutes, or until a toothpick comes out clean


- Let cool for 5 minutes and enjoy!


Monday, April 22, 2013

Balsamic Roasted Vegetables and Sausage

Hey everyone! I know it's been a while since I've posted a recipe (mostly because these days I'm not trying anything new!) But I have a great one for you today! I made this the other night and the husband and I both really enjoyed it. This was originally a recipe that I found on Pinterest but I tweaked it a little. Thanks to the husband who went to the store (twice) for me to get things I'd forgotten in order to make this. And thanks to whoever decided to build a Publix right across the street. It's super convenient for my forgetful pregnancy brain these days! Here's the recipe!

What you need (adapted from KayoticKitchen)

- 4 sausages (funny story about what I used below)
- 4-5 potatoes (I used red)
- 1 C baby carrots
- 1 red bell pepper
- 2 small onions
- 5 cloves garlic, peeled
- 2 T oil
- 1/2 C chicken broth (or veg. broth)
- 1 1/2 tsp Italian seasoning
- 4 T balsamic vinegar
- Salt and pepper


Directions

- Preheat oven to 425 degrees

- Cut all your vegetables however you like and place them in a roasting pan


 - In a small bowl, combine the oil, broth, vinegar and italian seasoning


- Pour the vinegar and spice mixture over the vegetables and stir well


- Season liberally with salt (the potatoes need it!) and pepper

- Roast for 40 minutes

- When the vegetables have about 10 minutes remaining, cook your sausage.

*Story time: I had bought organic chicken sausage for another recipe that I didn't end up making so I froze the sausage until later. Once I thawed it out it was in the fridge for a couple days before I went to use it for this recipe. Now, I don't know if it was actually "bad" but it sure smelled kinda funny to me (thank you pregnancy super nose) so I threw it out. Thus my husband's 2nd trip to the grocery store to get some more. This time around we got beef kielbasa and it was delicious. But feel free to use whatever you like and whatever smells good to you! *End story time.

- Once the sausage is browned, add to the vegetables and roast for 3-4 minutes. This allows the sausage to soak up some of the vinegar sauce.

- Remove and let cool a bit before serving. Stir well to get all the juices up from the bottom. 


- You can easily add other vegetables to this. Broccoli, green beans, sweet potatoes, squash...whatever you like!


- Enjoy!